Disclosure: This post contains affiliate links. If you purchase through our links, we may earn a small commission at no extra cost to you. We only recommend products we genuinely believe in.
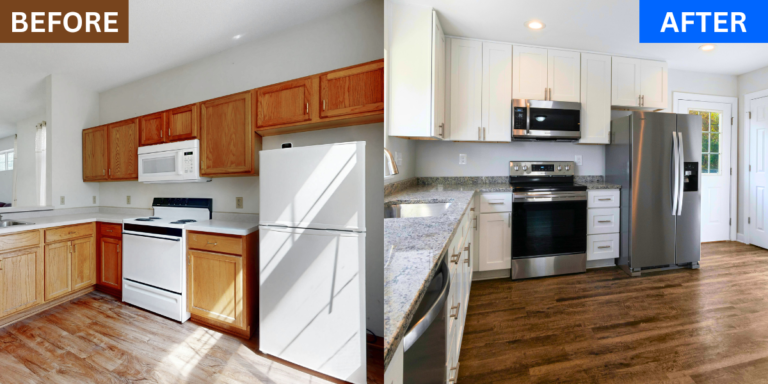
Learning how to paint kitchen cabinets without sanding is one of the smartest budget upgrades any homeowner can make in 2026. In fact, a full cabinet repaint can save you $3,000–$10,000 compared to replacing them — and skipping the sanding step makes the whole process faster, cleaner, and more beginner-friendly.
In this guide, you’ll learn exactly how to paint kitchen cabinets without sanding — with the right products, the correct order of steps, and the mistakes that ruin most DIY paint jobs.
Before you start, check out our full guide on kitchen renovation on a budget for more money-saving ideas.
Can You Really Paint Kitchen Cabinets Without Sanding?
Yes — but only if you use the right products and follow the correct process.
In fact, traditional cabinet painting requires sanding to help paint bond to the surface. However, in 2026, liquid deglosser and bonding primer have made sanding completely optional for most cabinet types.
The key is surface preparation. Sanding removes the glossy finish so paint can grip the wood. As a result, a good liquid deglosser does exactly the same job — chemically rather than physically — without the dust, the mess, or the hours of labor.
When skipping sanding works best:
- Cabinets with a smooth, non-textured surface
- Cabinets that are structurally sound with no peeling paint
- Laminate or wood cabinets in good condition
When you should sand:
- Cabinets with heavily chipped or peeling paint
- Cabinets with deep scratches or gouges
- Very old cabinets with multiple layers of old paint
What You’ll Need — Full Supply List
Before you start, gather everything. Stopping mid-project to go to the store is one of the biggest mistakes DIYers make.
🏆 Our Pick: Rust-Oleum Cabinet Transformations Complete Coating Kit
⭐ 4.2/5 | 73 Reviews | Amazon’s Choice
✅ No sanding, no stripping, no priming required
✅ Includes Bond Coat + Protective Top Coat + Krud Kutter
✅ Available in multiple colors
💰 $59.97 — complete kit, everything included
👉 Check Price on AmazonFull supply list:
- Liquid deglosser or TSP substitute
- Bonding primer (oil-based or shellac)
- Cabinet paint (water-based alkyd recommended)
- High-density foam roller
- Angled paintbrush (2-inch)
- Painter’s tape
- Microfiber cloths
- Screwdriver to remove hardware
- Small containers for hardware
- Drop cloth

🏆 Our Pick: Zinsser Bulls Eye 1-2-3 Primer — 1 Quart
⭐ 4.6/5 | 5,740 Reviews | #1 Best Seller in Primer Paint
✅ Bonds to all surfaces without sanding
✅ 50% greater adhesion — extreme durability
✅ 3K+ bought in the past month
💰 $10.59 — best value primer on Amazon
👉 Check Price on AmazonHow to Paint Kitchen Cabinets Without Sanding — Step by Step
Step 1: Remove Cabinet Doors and Hardware
Start by removing all cabinet doors, drawers, and hardware. Moreover, number each door with masking tape on the inside so you know exactly where each one goes back.
Place all screws and hinges in labeled zip-lock bags. This single step prevents hours of frustration during reassembly.
Pro tip: Lay doors flat on sawhorses or a clean drop cloth in your garage. Painting doors flat prevents drips and gives a much smoother finish than painting them vertically.
Step 2: Clean Every Surface — The Most Important Step
In fact, this is the single most important step in how to paint kitchen cabinets without sanding. Paint will not bond properly to greasy or dirty surfaces — no matter what products you use.
Use a degreaser to clean every cabinet box, door, and drawer front. Pay special attention to areas around the stove where grease builds up over time.
What to clean with:
- TSP substitute cleaner
- Dawn dish soap and warm water
- White vinegar solution
Wipe everything down twice and let it dry completely — at least 2 hours — before moving on.
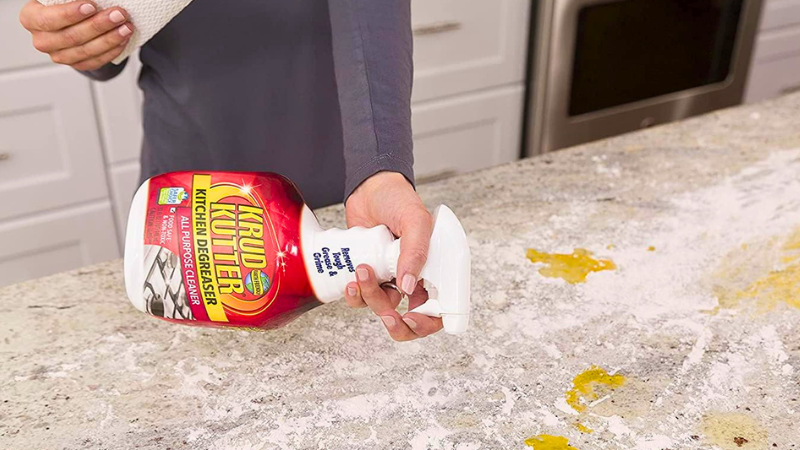
🏆 Our Pick: Krud Kutter Kitchen Degreaser — 32 oz
⭐ 4.4/5 | 4,191 Reviews
✅ Removes tough grease and grime instantly
✅ Food safe and non-toxic — no bleach or ammonia
✅ EPA Safer Choice certified
💰 Under $15 — most underrated product in any cabinet paint job
👉 Check Price on AmazonStep 3: Apply Liquid Deglosser — Skip the Sandpaper
Once the cabinets are clean and dry, apply liquid deglosser to every surface you plan to paint. This is what replaces sanding — it chemically etches the glossy finish so primer and paint can bond properly.
Apply the deglosser with a clean microfiber cloth, rubbing it into the surface in a circular motion. Let it sit for 10–15 minutes as specified on the label.
Important: Work in a well-ventilated area. Liquid deglosser has strong fumes. However, the results are worth it — no dust, no mess, no hours of physical labor.
Do not rinse the deglosser off — simply let it dry completely.
Step 4: Apply Bonding Primer — Never Skip This Step
This step is non-negotiable. In fact, skipping primer is the number one reason DIY cabinet paint jobs fail within 6–12 months.
Apply a thin, even coat of bonding primer to every surface using a high-density foam roller. In addition, use an angled brush for corners, edges, and detail areas.
Key tips for priming:
- Apply thin coats — thick primer causes drips and brush marks
- Allow full drying time between coats
- Apply 2 coats of primer for best adhesion
- Lightly sand with 220-grit between primer coats only if you want an ultra-smooth finish
The primer coat will look a little rough — that’s completely normal. The paint coats will smooth everything out.
Step 5: Apply Cabinet Paint — Thin Coats Only
Now for the satisfying part. Apply your cabinet paint in thin, even coats using a foam roller for flat surfaces and an angled brush for edges.
The most important rule: thin coats only.
As a result, two thin coats always looks better than one thick coat. Thick coats drip, sag, and take forever to dry. Thin coats dry faster, level better, and produce a much smoother finish.
🏆 Our Pick: Beyond Paint All-in-One Cabinet Paint — No Sanding
⭐ 4.0/5 | 1,464 Reviews
✅ No sanding, no stripping, no priming — bonds, primes & seals in one
✅ Self-leveling matte finish — no roller marks
✅ Works on cabinets, countertops, furniture & doors
✅ Available in 12+ colors — indoor & outdoor use
💰 From $27.46 per pint — covers 5–7 cabinet fronts
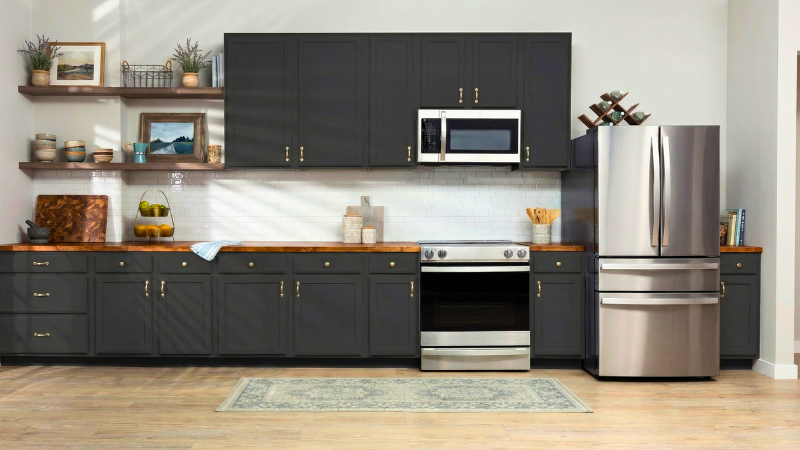
👉 Check Price on AmazonBest cabinet colors for 2026:
- White — Classic, timeless, makes kitchens look larger
- Sage green — The biggest kitchen color trend of 2026
- Navy blue — Bold, pairs beautifully with brass hardware
- Greige — Warm, neutral, works with any countertop
Allow each coat to dry fully before applying the next. Most cabinet paints need 2–3 coats for complete coverage.
Step 6: Reinstall Doors and Upgrade Hardware
Once the final coat is completely dry — wait at least 24–48 hours — reinstall the cabinet doors and hardware.
Furthermore, this is the perfect time to upgrade your cabinet hardware. New handles and hinges can completely transform the look of your freshly painted cabinets for under $50.
🏆 Our Pick: Ravinte 30-Pack Cabinet Pulls — Matte Black
⭐ 4.7/5 | 37,869 Reviews | Amazon’s Choice
✅ Stainless steel — won’t rust or chip
✅ 3K+ bought in the past month
✅ Fits standard 3-inch hole spacing
💰 $26.99 for 30 pulls — under $1 each
👉 Check Price on AmazonCommon Mistakes to Avoid
Skipping the cleaning step is the number one cause of paint failure. No amount of primer will stick to a greasy surface.
Using regular wall paint is the second biggest mistake. However, wall paint is simply not durable enough for kitchen cabinets — you need paint specifically formulated for cabinets or trim.
Applying thick coats causes drips, brush marks, and an uneven finish. Always apply thin, even coats and allow proper drying time between each one.
Not waiting long enough before reinstalling doors ruins many otherwise perfect paint jobs. Cabinet paint needs 24–48 hours to dry and several weeks to fully cure. During curing, handle the cabinets gently to avoid scratches.
Painting in high humidity causes paint to dry slowly and results in a tacky finish. Ideal conditions are 50–85°F with humidity below 70%.
How Long Does It Take?
| Step | Time Required |
|---|---|
| Removing doors and hardware | 1–2 hours |
| Cleaning all surfaces | 2–3 hours |
| Applying deglosser | 1 hour |
| Priming (2 coats + drying) | 4–6 hours |
| Painting (2–3 coats + drying) | 6–10 hours |
| Reinstalling doors | 1–2 hours |
| Total | 2–3 weekends |
How Much Does It Cost?
| Item | Cost |
|---|---|
| Bonding primer | $20–$30 |
| Cabinet paint (1 gallon) | $40–$70 |
| Liquid deglosser | $15–$20 |
| Foam rollers and brushes | $15–$25 |
| Painter’s tape | $8–$12 |
| Degreaser | $10–$15 |
| Total | $108–$172 |
Compare that to hiring a professional ($800–$3,000) or replacing cabinets entirely ($3,000–$10,000+) — and the savings are undeniable.
Frequently Asked Questions
Do I really need primer when painting cabinets without sanding?
Yes — always. Bonding primer is what makes the no-sand method work. Without primer, your paint will chip and peel within months.
How long do painted cabinets last without sanding?
With proper preparation, cleaning, priming, and quality paint, painted cabinets can last 5–10 years before needing a refresh.
What is the best paint for kitchen cabinets without sanding?
Water-based alkyd paint is the top choice in 2026. It applies like latex but cures to a hard, durable finish similar to oil paint.
Can I paint laminate cabinets without sanding?
Yes — laminate cabinets are actually easier to paint without sanding because the surface is already smooth. Use a bonding primer designed for laminate and follow the same process.
How many coats do kitchen cabinets need?
Plan for 2–3 coats of paint on top of 2 coats of primer. Thin, even coats always produce better results than fewer thick coats.
Should I use a brush or roller?
Use both. A high-density foam roller for flat surfaces produces the smoothest finish. Use an angled brush for edges and corners.
Final Thoughts
Painting kitchen cabinets without sanding is one of the highest-impact, most affordable home upgrades you can do in 2026. With the right preparation, the right products, and a little patience, you can completely transform your kitchen for under $200.
Most importantly, clean thoroughly, prime without exception, apply thin coats, and allow proper drying time.
Want more budget kitchen ideas? Check out our guide on kitchen renovation on a budget for more money-saving upgrades.